

Introduction
we recognize the essential soundness of the Nokia 3310 will tell you how to play on the Arduino the snake-Game between games.
Let’s go,
we list the ingredients that are required before the first;
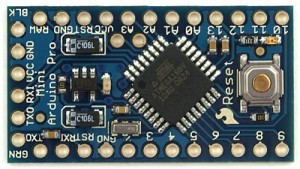
The Arduino Pro Mini
(would have to if you use the Arduino UNO R3.)
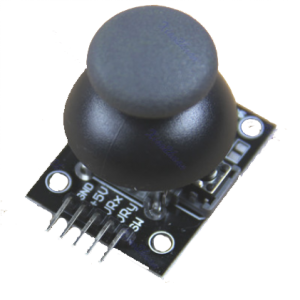
Joystick Arduino Shield
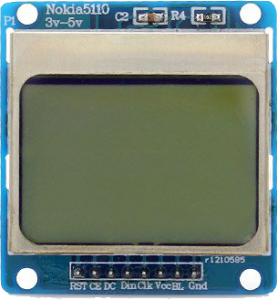
Nokia 5110 LCD Module
+ 9V battery and battery Title (If you use an Arduino Pro Mini, it is necessary to feed outside our Arduino.)
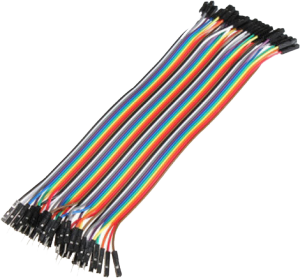
Male-Female Arduino Jumper Cables (preferred due to an LCD screen and joystick are required to make a connection with the Arduino legs.)
If the elements where we can provide our AliExpress (international) or direnc.net (domestic) would recommend sites like.
The connection of the components will be as follows:
lcd’miz RST, CE, DC, Religion, Clk, Vcc, BL, there are three such Gnd. These ends fulfills various functions.
Screen LCD connection with the Arduino:
RST end of the 11 numbered pins to the CE end of the 12 numbered pins on the DC end of the 10 numbered pins on Religion tip 9 numbered pins to Clk end 8 to pins to Vcc end 3.3V ‘(This varies depending on the LCD screen of your property, others 3.3V’t when running, some can operate at voltages from 3.3V to 5V, connect you 3.3V terms that guarantee.) BLU tip 3.3V or 5V (what I said above, this also applies to pin) Gnd terminal GND pin ‘ in will be connected.
There is also a library that is required to run the LCD, you can download the library from this obligation. Http://www.henningkarlsen.com/electronics/library.php?id=47
After downloading this library out of the rare, that folder is C: \ Program Files (x86) \ Arduino \ libraries directory, you must copy below.
Our link between the Arduino with the joystick:
GND terminal Arduino the GND terminal of + 5V end or tip Arduino Vcc of 5V end VRX end Arduino the A0 end vry end Arduino the A1 end
After completing this process, we can take the following code we compile our Arduino.
#include<LCD5110_Graph.h>LCD5110 myGLCD(8,9,10,11,12); extern unsigned char SmallFont[]; extern unsigned char TinyFont[];int endgame = 10; int zx[300] = {26, 25, 24, 23, 22}; int zy[300] = {20, 20, 20, 20, 20};int len=5; int navi=4; int x,y,mx,my;long pM = 0; long per = 75; void setup(){ myGLCD.InitLCD(); myGLCD.setFont(SmallFont); for(int u=5; u <= 300-1; u++) {zx[u]=-1;zy[u]=-1;} mx=random(84); my=random(44);mx=random(84); my=random(44);}void loop(){ int b0=analogRead(A0);int b1=analogRead(A1);if((b0 < 400)and(navi!=4)) {navi=3;}if((b0 > 600)and(navi!=3)) {navi=4;}if((b1 < 400)and(navi!=1)) {navi=2;}if((b1 > 600)and(navi!=2)) {navi=1;}if(zx[0] < 0) {endgame=0;}if(zx[0] > 83) {endgame=0;}if(zy[0] < 0) {endgame=0;}if(zy[0] > 49) {endgame=0;} unsigned long cM = millis();if(cM - pM > per) {pM = cM; myGLCD.clrScr(); for(int i=1; i < len; i++) { myGLCD.drawRect(zx[i], zy[i], zx[i]+1, zy[i]+1); } x=zx[0]; y=zy[0]; for(int t=len; t > 0; t--) { zx[t]=zx[t-1]; zy[t]=zy[t-1]; } switch(navi) {case1: y--; break; case2: y++; break; case3: x--; break; case4: x++; break; } zx[0]=x; zy[0]=y; myGLCD.drawRect(zx[0], zy[0], zx[0]+1, zy[0]+1); myGLCD.drawRect(mx, my, mx+1, my+1); if(((x==mx)or(x+1==mx)or(x-1==mx)) and((y==my)or(y+1==my)or(y-1==my))) {len=len+10; per=per-5; mx=random(84); my=random(44);} myGLCD.update(); } if(endgame == 0) {myGLCD.clrScr();myGLCD.print("kaybettin :(", CENTER, 12); myGLCD.print("puan:", 15, 22);myGLCD.printNumI(len*2, 50, 22); myGLCD.update();delay(8000);}}To give some notes:
♦ If you use an Arduino Pro Mini + 9V battery + terminal (if you received title to the red battery cable) is required to connect the RAW pin. – The end (you must connect the black cable) GND pins.
♦ If you do go up and down the joystick left-right snake game you might have done wrong with your Arduino Joystick connection. A0 and A1 replace nozzles.
♦ If you use the Arduino UNO R3, and you can feed circuit via USB to the lack of raw end on this card or adapter tip + 9V battery you can feed with the entry.
♦ Code laying compile Tools / Make sure you select the correct card from the Board of!
You must know your card you’re using an Arduino Pro Mini, because there are many different versions. But it is generally around 5V 16MHz ATmega328 series on the market.


