

we have a test of Arduino, this time we are conducting a test of the W5100 Ethernet module, which has the ability to connect our Arduino projects to the Internet and our local area networks (LAN).
What should you keep in mind to control a servo motor with an Arduino Ethernet W5100 ?
The next test is to connect a servo motor to the Arduino Mega 2560 board and control it through an Ethernet communication with W5100 module, in this module we will set up a small web server and through it we will turn 90 degrees a servo motor from Local website hosted on that server.
For this test the following items are required:
1 Arduino Mega 2560 Card or Arduino Uno.
2 Ethernet Module w5100
3 Servo Motor
4 Direct UTP Patch cord to connect the module to the LAN
5. Adapter 6-9 VDC (Required in some cases for the servo current )
Here is the wiring diagram of the servo motor, Arduino Mega 2560 and W5100 module:
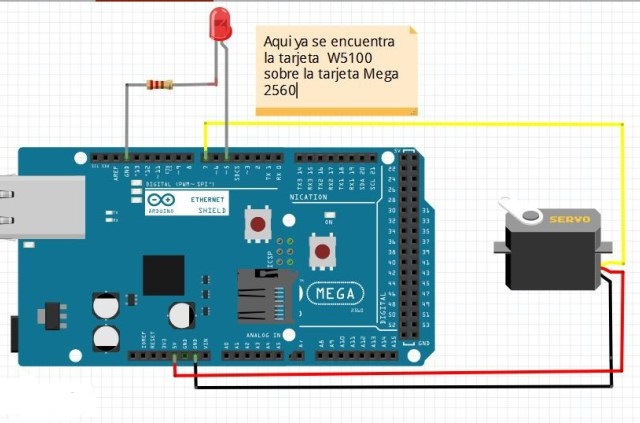
The control wire of servo motor (yellow wire) should be on pin 7 and the LED should be connected to pin 5, the servo motor is connected to the voltage source of the mega card 2560 with its red and black wires 5V and 0V (GND ) respectively.
The code to be loaded on the Mega 2560 development board, is in my GitHub repository.
| //// Servo control a traves del modulo W5100 |
| #include <SPI.h> |
| #include <Ethernet.h> |
| #include <Servo.h> |
| Servo myservo; // create servo object to control a servo |
| byte mac[] = { 0xDE, 0xAD, 0xBE, 0xEF, 0xFE, 0xED }; //physical mac address |
| byte ip[] = { 192, 168, 0, 14 }; // ip in lan |
| byte gateway[] = { 192, 168, 0, 1 }; // internet access via router |
| byte subnet[] = { 255, 255, 255, 0 }; //subnet mask |
| EthernetServer server(80); //server port |
| String readString; |
| ////////////////////// |
| void setup(){ |
| pinMode(5, OUTPUT); //pin selected to control |
| myservo.attach(7); //the pin for the servo control |
| //start Ethernet |
| Ethernet.begin(mac, ip); |
| server.begin(); |
| //enable serial data print |
| Serial.begin(9600); |
| Serial.println(“server servo/pin 5 test 1.0”); // so I can keep track of what is loaded |
| } |
| void loop(){ |
| // Create a client connection |
| EthernetClient client = server.available(); |
| if (client) { |
| while (client.connected()) { |
| if (client.available()) { |
| char c = client.read(); |
| //read char by char HTTP request |
| if (readString.length() < 100) { |
| //store characters to string |
| readString += c; |
| //Serial.print(c); |
| } |
| //if HTTP request has ended |
| if (c == ‘\n’) { |
| /////////////// |
| Serial.println(readString); //print to serial monitor for debuging |
| client.println(“HTTP/1.1 200 OK”); //send new page |
| client.println(“Content-Type: text/html”); |
| client.println(); |
| client.println(“<HTML>”); |
| client.println(“<HEAD>”); |
| client.println(“<TITLE>Arduino Servo WEB</TITLE>”); |
| client.println(“</HEAD>”); |
| client.println(“<BODY>”); |
| client.println(“<H1>Link para controlar un servo</H1>”); |
| client.println(“<a href=\”/?on\”\”>IZQUIERDA</a>”); |
| client.println(“<a href=\”/?off\”\”>DERECHA</a>”); |
| client.println(“</BODY>”); |
| client.println(“</HTML>”); |
| delay(1); |
| //stopping client |
| client.stop(); |
| ///////////////////// control arduino pin |
| if(readString.indexOf(“?on”) >0)//checks for on |
| { |
| myservo.write(10); |
| digitalWrite(5, HIGH); // set pin 4 high |
| Serial.println(“Led On”); |
| } |
| if(readString.indexOf(“?off”) >0)//checks for off |
| { |
| myservo.write(110); |
| digitalWrite(5, LOW); // set pin 4 low |
| Serial.println(“Led Off”); |
| } |
| //clearing string for next read |
| readString=””; |
| } |
| } |
| } |
| } |
| } |
Is important chech the IP address of your modem from the windows console and with this IP address asign an address to w5100 module into LAN range to communicate properly .


")


