

Introduction
Hi Friends, we provide in terms of servo motors manually using the joystick at the same time we do a project today we can see the LCD screen. Previously made servo motor control with the joystick and LCD display for our benefit, you will now be able to see very well what it was.
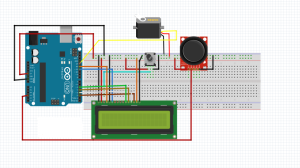
Used materials:
- Arduino UNO R3
- Joystick
- 10K pot
- Servo-motor
- Breadboard
- Cables
Circuit Diagram
Program Code
# Include <liquidcrystal.h># Include <Servo.h>Lcd liquidcrystal (12,11,5,4,3,2);// LCD RS = 12 - 11 = ENABLE - D7 = 5, D6 = 4, D5 = 3, D4 = 2 - R / W = GNDconst int servo1 = 13; // No. 5 pin digital servo 1const int yonx = 3; // left and right analogue 3inter servodeg;Power servomotor1;void setup () {lcd.beg of (16.2); // defined health 2x16 LCD and use the LCD.// Servo-motorservomotor1.attach (servo1);}void loop () {servodeg R = analogread (yonx); // read the joystick in the value we put into our variable.servodeg R = map (servodeg is 0, 1023, 0, 180); // 0-180 degrees rotationservomotor1.writ (ER servodeg);delay (15);lcd.setcurs is (0,0); // we are launching the first corner of the LCD cursor to the left and we print our article.LCDs. print ("Power Rating");LCDs. print (servodeg is); // convert our command, we press the screen with the map command.lcd.setcurs is (0,1); // 2. We bring the cursor line and we print our article.LCDs. print ("engineers gallery");delay (500);lcd.cle is (); Clearing // screen.}


