

Introduction
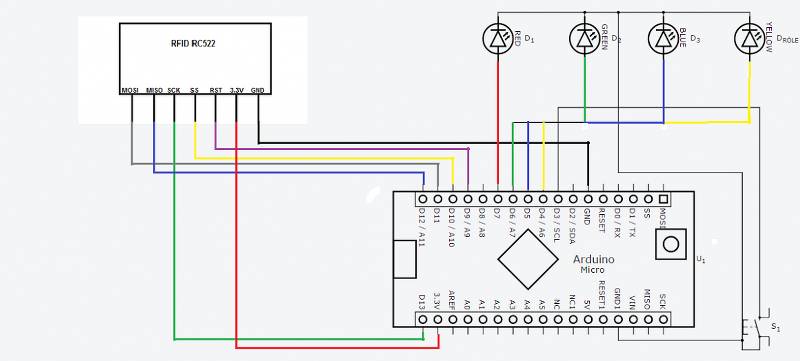
This project unlocked the door with our overall RFID application RC522 , but let me explain as best I can. RFID-RC522 with building shield room and so on. A system that is used to unlock the door to the place of application. I have a master card and its surrounding cards. Master card, such as locksmith consider how copying your key is in your hands as you take his akbil, school board and so on. You okutuy system after the master card and the card system in the card code signing. This is perfectly normal and have a system that will not harm your cards because these cards already exists for it. Thread Turning slightly to detail has been my I installed red white blue and there is a red LED (Imagine the green LED white was not green in my hand) one that mistake one of the red LEDs are seeing is actually the relay task. White and blue if they are made in order to understand what the system was trying to say. If necessary the pins needed to yazıcam comment below. For 3.p EEPROM reset button (the button 3.p the data if you never put the pole GND) 4.p relay, 5 blue LEDs, green LEDs 6, 7 red LEDs was appointed.
If you have a phone card instead nfc’l use the card you can see the project task.
Arduino:
Arduino is an open-source prototyping platform based on easy-to-use hardware and software. Arduino bords are able to read inputs – light on a sensor, a finger on a button, or a Twitter message – and turn it into an output – activating a motor, turning on an LED, publishing something online. You can tell your board what to do by sending a set of instructions to the microcontroller on the board. To do so you use the Arduino programming language (based on wiring), and the arduino software (IDE), based on Processing.
Over the years Arduino has been the brain of thousands of projects, from everyday objects to complex scientific instruments. A worldwide community of makers – students, hobbyists, artists, programmers, and professionals – has gathered around this open-source platform, their contributions have added up to an incredible amount of accessible knowledge that can be of great help to novices and experts alike.
Arduino was born at the Ivrea Interaction Design Institute as an easy tool for fast prototyping, aimed at students without a background in electronics and programming. As soon as it reached a wider community, the Arduino board started changing to adapt to new needs and challenges, differentiating its offer from simple 8-bit boards to products for IoT applications, wearable, 3D printing, and embedded environments. All Arduino boards are completely open-source, empowering users to build them independently and eventually adapt them to their particular needs. The software, too, is open-source, and it is growing through the contributions of users worldwide.
RFID:
RFID stands for Radio-Frequency Identification. The acronym refers to small electronic devices that consist of a small chip and an antenna. The chip typically is capable of carrying 2,000 bytes of data or less.
The RFID device serves the same purpose as a bar code or a magnetic strip on the back of a credit card or ATM card; it provides a unique identifier for that object. And, just as a bar code or magnetic strip must be scanned to get the information, the RFID device must be scanned to retrieve the identifying information.
The project is going to be like in diagram form:
Necessary materials:
- Arduino Arduino UNO or any kind of bi
- RFID-RC522 Module
- 4 Led
- Electromagnetic cards or NFC with a smartphone
- Jumpers
Connections:
- Red Led – 7
- Green Led – 6
- Blue LED – 5
- Led Relay – 4
- EEPROM Reset – 3
- MOU – 11
- MISO – 12
- SCK – 13
- SS (SDA) – 10
- RST – 9


 ATTACHMENT FOR LATHE")


