
Introduction: (Initial Observation)
In this project you will make and demonstrate a simple electric circuit. You will learn about electrical conductors (such as wires and metals), insulators (such as plastic coating on the wire) and the concept of electrical circuits. Combine the joy and excitement of making educational toys with your science project by constructing a simple electric circuit you may use as a night light. This is a good way of learning about simple electric circuits. |
||||||||||
Information Gathering:
|
||||||||||
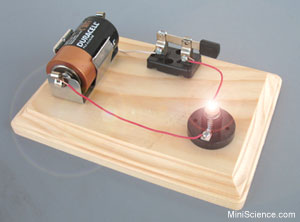
Make a Simple Electric CircuitIntroduction: A Simple Electric Circuit is a circuit including a power source (battery), a resistor (light bulb) and a switch connected to each other in series (meaning that wires connect the battery to the switch, the switch to the light bulb and the light bulb back to the other end of the battery). Connection of wires to the battery holder, switch and the lamp base are usually done using the screws or clips. You can use household tools such as a pair of scissors to cut the wire and remove the insulation from the contact points. You will also need a D size battery to power your circuit. Instructions:Use the picture bellow to see how you must mount the components on the board. Use small mounting screws to mount the battery holder, the switch and the lamp holder to the appropriate places on the board. A screw driver and assistance of an expert adult may be required.
Test your circuit:Insert the battery, screw a light bulb into the lamp holder and close the switch. The light bulb must light up. If it does not check all the contacts and try again. You may also need to check the battery and the light bulb.
Opportunities for Science Projects
|
||||||||||
Materials and Equipment:
|
||||||||||


|
|
||||||||


The above materials are available in the form of a kit at robotiik.com. The product code is KITSEC and you can order it online.
Results of Experiment (Observation):
Experiments are often done in series. A series of experiments can be done by changing one variable a different amount each time. A series of experiments is made up of separate experimental “runs.” During each run you make a measurement of how much the variable affected the system under study. For each run, a different amount of change in the variable is used. This produces a different amount of response in the system. You measure this response, or record data, in a table for this purpose. This is considered “raw data” since it has not been processed or interpreted yet. When raw data gets processed mathematically, for example, it becomes results.
No calculations are required for this project; however, if you do any calculations, make sure to write them in this section of your report.
Summary of Results:
Summarize what happened.
Studying tables and graphs, we can see trends that tell us how different variables cause our observations. Based on these trends, we can draw conclusions about the system under study. These conclusions help us confirm or deny our original hypothesis. Often, mathematical equations can be made from graphs. These equations allow us to predict how a change will affect the system without the need to do additional experiments. Advanced levels of experimental science rely heavily on graphical and mathematical analysis of data. As a result, science becomes even more interesting and powerful.
Using the trends in your experimental data and your experimental observations, try to answer your original questions. Is your hypothesis correct? Now is the time to pull together what happened, and assess the experiments you did.
What you have learned may allow you to answer other questions. Many questions are related. Several new questions may have occurred to you while doing experiments. You may now be able to understand or verify things that you discovered when gathering information for the project.
Why don’t the birds get killed when they sit on high voltage electrical cables?
This is a common question for those who know “most high voltage electrical cables have no insulation.”. The answer is simple. Because High voltage electricity can kill if it passes trough your body. When birds sit on the power cable, the electrical current cannot pass trough their body because no part of their body is touching the ground or any other wire. With the same token, someone wearing thick rubber shoes may touch a 110 volt electrical cable with one hand and stay safe. For very high voltages such as 6000 volts, no insulation can protect us and also we must stay at least 5 feet away from such high voltage cables. (As a result why most of all cables don’t have any insulation on them).
If you did not observe anything different than what happened with your control, the variable you changed may not affect the system you are investigating. If you did not observe a consistent, reproducible trend in your series of experimental runs there may be experimental errors affecting your results. The first thing to check is how you are making your measurements. Is the measurement method questionable or unreliable? Maybe you are reading a scale incorrectly, or maybe the measuring instrument is working erratically.If you determine that experimental errors are influencing your results, carefully rethink the design of your experiments. Thus Review each step of the procedure to find sources of potential errors. Also If possible, have a scientist review the procedure with you. Sometimes the designer of an experiment can miss the obvious.
List your references in this part of your report.


, a resistor (light bulb) and a switch connected to each)