

INTRODUCTION:
This was one of my first projects. As I researched the instruct able, I saw some projects of alarm clocks, and Bluetooth speakers, but none like this, so I wanted to share with you guys.
In this project I made an alarm clock with an 8 digit display. This clock does not have buttons, and all the configuration is done via IR (infrared), with a TV remote, or any other IR remote. In the early days I put a buzzer, so you could configure two different alarm times (but by changing the code you can put whatever N amount of different alarms you want).
Also I did put a microphone in it, so the display is always off, and just activating when it hears a sound. This is very useful if you don’t want all that light upon your face when you are trying to sleep, and just activates when you clap your hands or whatever. I used a humidity sensor to detect this variable and the temperate too.
In the future I plan to put a relay module, so the Arduino could activate a humidifier when your bedroom gets too dry (because of the air conditioning). Another thing I did was to use an old Sony Ericsson MPS-60 speaker I had to play music from my cellphone, via Bluetooth.
COMPONENTS:
-
Humidity sensor DHT11
-
Arduino Pro Mini 5V
-
Amplifier 2x3W
-
HX1838 and infrared remote
-
Sound sensor
-
Buzzer
-
8 Digit display
-
Prototyping PCB
-
Bluetooth receiver
-
Arduino pro mini programmer
-
A tube for the box;
-
Sony Ericsson MPS-60 or any other two speakers you may have;
-
Silicon glue;
-
Plenty of wires, electric tape, common drills and a bigger (flat bit for wood) wich you will use to make the bigger holes for the speakers, and two different old cellphone chargers, to transform 110/220V to 5V, one you will use on the amplifier circuit and the other with the arduino, otherwise when the music is on, the arduino will shut down.
SOLDERING AND MOUNTING THE PCB:
Start soldering the prototyping PCB following the connections listed below. I used connectors to plug the components, as seen in one of the images above, but it was a personal choice. This way, in future projects I still can change their configuration, add and remove pieces.

-
Sound detector
-
Pin 0 >>> GND;
-
Pin 1 >>> Arduino Pro Mini – Digital input pin 13;
-
Pin 2 >>> VCC;
-
-
Buzzer
-
Pin 0 >>> GND;
-
Pin 1 >>> Arduino Pro Mini – Digital input pin 12;
-
Pin 2 >>> VCC;
-
-
Infrared sensor
-
Pin 0 >>> GND;
-
Pin 1 >>> VCC (the positive pin is the middle one, watch out);
-
Pin 2 >>> Arduino Pro Mini – Digital input pin 12;
-
-
DHT11
-
Pin 0 >>> VCC;
-
Pin 1 >>> Arduino Pro Mini – Analog input A0;
-
Pin 2 >>> Not Used;
-
Pin 3 >>>GND;
-
-
Display
-
Pin 0 >>> VCC;
-
Pin 1 >>> GND;
-
Pin 2 >>> Arduino Pro Mini – Digital input pin 04;
-
Pin 3 >>> Arduino Pro Mini – Digital input pin 05;
-
Pin 4 >>> Arduino Pro Mini – Digital input pin 06.
-
Note: the digital pins can be anyone you want, but the DHT11 have to be an analog input pin. You can change the pins inside the code. I suggest you try your assembly on the breadboard first before soldering. At last you just have to connect the 5V fountain on the VCC and GND of the arduino, and that’s it.
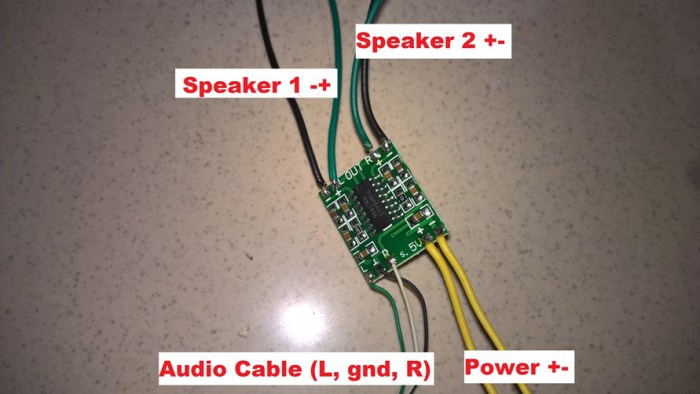
SOLDERING AND MOUNTING THE SPEAKERS:
This part is easy. Just solder the amplifier pins using the image as a guide. The amplifier has positive and negative pins that will come from a different 5V fountain (than the one that goes to the arduino), two pins for each of the speakers you have, and three others that goes on the stereo sound cable: one is the common, one is for left channel and one for right channel.
Use the drills to make the holes for the speakers and one for the microphone, and one for the buzzer. Glue everything with silicon. Plug the bluetooth receiver on the audio cable that goes to the amplifier and at last solder positive and negative wires on the USB pins of the receiver (you cant dismount the receiver and solder directly on the board, it’s easy).


