

Analog sensor based project on Arduino Lilypad.
[nextpage title=”Summary” ]

I am gonna post a small project in which we will see how to use arduino lilypad library and produce an Arduino Lilypad simulation in Proteus. In this Arduino Lilypad simulation in Proteus, I am gonna use the Arduino Lilypad board along with few LED lightsand will make them blink.
Its also quite easy and you can also download the simulation and the hex file at the end of this project but I would suggest you to do it yourself so that you learn something out of it.
Before starting this project, you must have first integrated the Arduino Lilypad Library as without it you wont be abe to do this project. So, if you haven’t downloaded it yet then send me request for source of Arduino Lilypad library in Proteus.
[sam id=”5″ codes=”true”]
You can clearly see in the Diagram tab, the Arduino Lilypad Simulation in Proteus. After that you need to write a code for Arduino Lilypad so that you could get the hex file for it.
In this project, I have used five LED lights and make them ON and OFF using the switch button. If the button is not pressed then the LEDs will remain ON and when you hit the button , the LEDs will go OFF.
[sam id=”3″ codes=”true”]
[/nextpage]
[nextpage title=”Circuit Diagram” ]
[sam id=”5″ codes=”true”]
[/nextpage]
[nextpage title=”Description” ]
After compiling this code, get the hex file of code.
Now upload this hex file into this Arduino Lilypad and hit the RUN button.
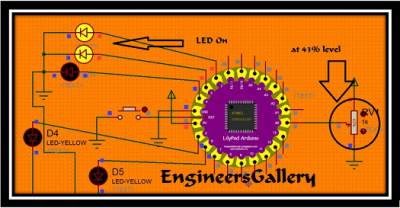
If everything’s goes fine then as you hit the run button, the LEDs will get ON as shown in the below figure:
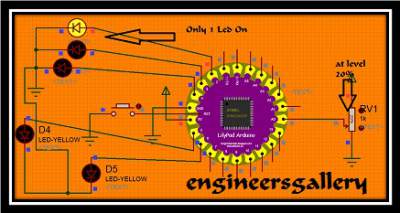
Now, when you press the button, these LEDs will go OFF as shown in the below figure:
[sam id=”5″ codes=”true”]
That’s all, you have successfully implemented the Arduino Lilypad simulation in Proteus.
[/nextpage]
[nextpage title=”Code” ]
Copy the below code and paste it into the Arduino software and compile.
[message_box title=”Code” color=”red”]
// Code By EngineersGallery.
int analogPin = A0;
int ledCount = 5;
int ledPins[] = {
2, 3, 4, 5, 6};
void setup() {
// loop over the pin array and set them all to output:
for (int thisLed = 0; thisLed < ledCount; thisLed++) {
pinMode(ledPins[thisLed], OUTPUT);
}
}
void loop() {
// read the potentiometer:
int sensorReading = analogRead(analogPin);
// map the result to a range from 0 to the number of LEDs:
int ledLevel = map(sensorReading, 0, 1023, 0, ledCount);
// loop over the LED array:
for (int thisLed = 0; thisLed < ledCount; thisLed++) {
// if the array element’s index is less than ledLevel,
// turn the pin for this element on:
if (thisLed < ledLevel) {
digitalWrite(ledPins[thisLed], HIGH);
}
// turn off all pins higher than the ledLevel:
else {
digitalWrite(ledPins[thisLed], LOW);
}
}
}
[sam id=”5″ codes=”true”]
[/message_box]
[/nextpage]
[sam id=”3″ codes=”true”]
[youtube height=”HEIGHT” width=”WIDTH”]http://youtu.be/YP2p-loiYY0[/youtube]
You can download or understand how to install arduino library in proteus, for detail click below link
Arduino proteus library.


